 Customer reviews for Backyard Discovery Skyfort II Cedar Swing Set/PlaySet for
Member photos


 +856 images
Lots of Features
We had it in the garage awhile before we built it. It went together fairly easily. We We did a lot of prep work in water sealing each board and sorting parts which allows us to do most of the build in one 9 hour day with 4 people. It isn't quite finished in this picture but if you look closely, you can see that even the cat likes the hideaway.
The best and easiest to build!
I love building this for my son considering I am the mother. Of a 6 year old big boy I managed to assemble this all by myself. Thank you backyard Discovery for making this experience as easy and convenient with every piece of wood packaged in the boxes. Thank you.
Anxiously awaiting setup
The playset was delivered a week or so. My husband plans to start on it this week. I am excited and the boys keep asking about it. When the set was delivered, there was a box that was damaged. The delivery guy was super nice and noted it and told us to keep our eye out for damaged pieces. We found one piece that had been splintered. We called customer service and they said they would send us a new piece. Also, the playset did not come with instructions. We were told to download it from the website. For the money, you would think they could add a complimentary set of instructions. Hopefully the set-up goes well! So far service has been great.
Love This Playset!
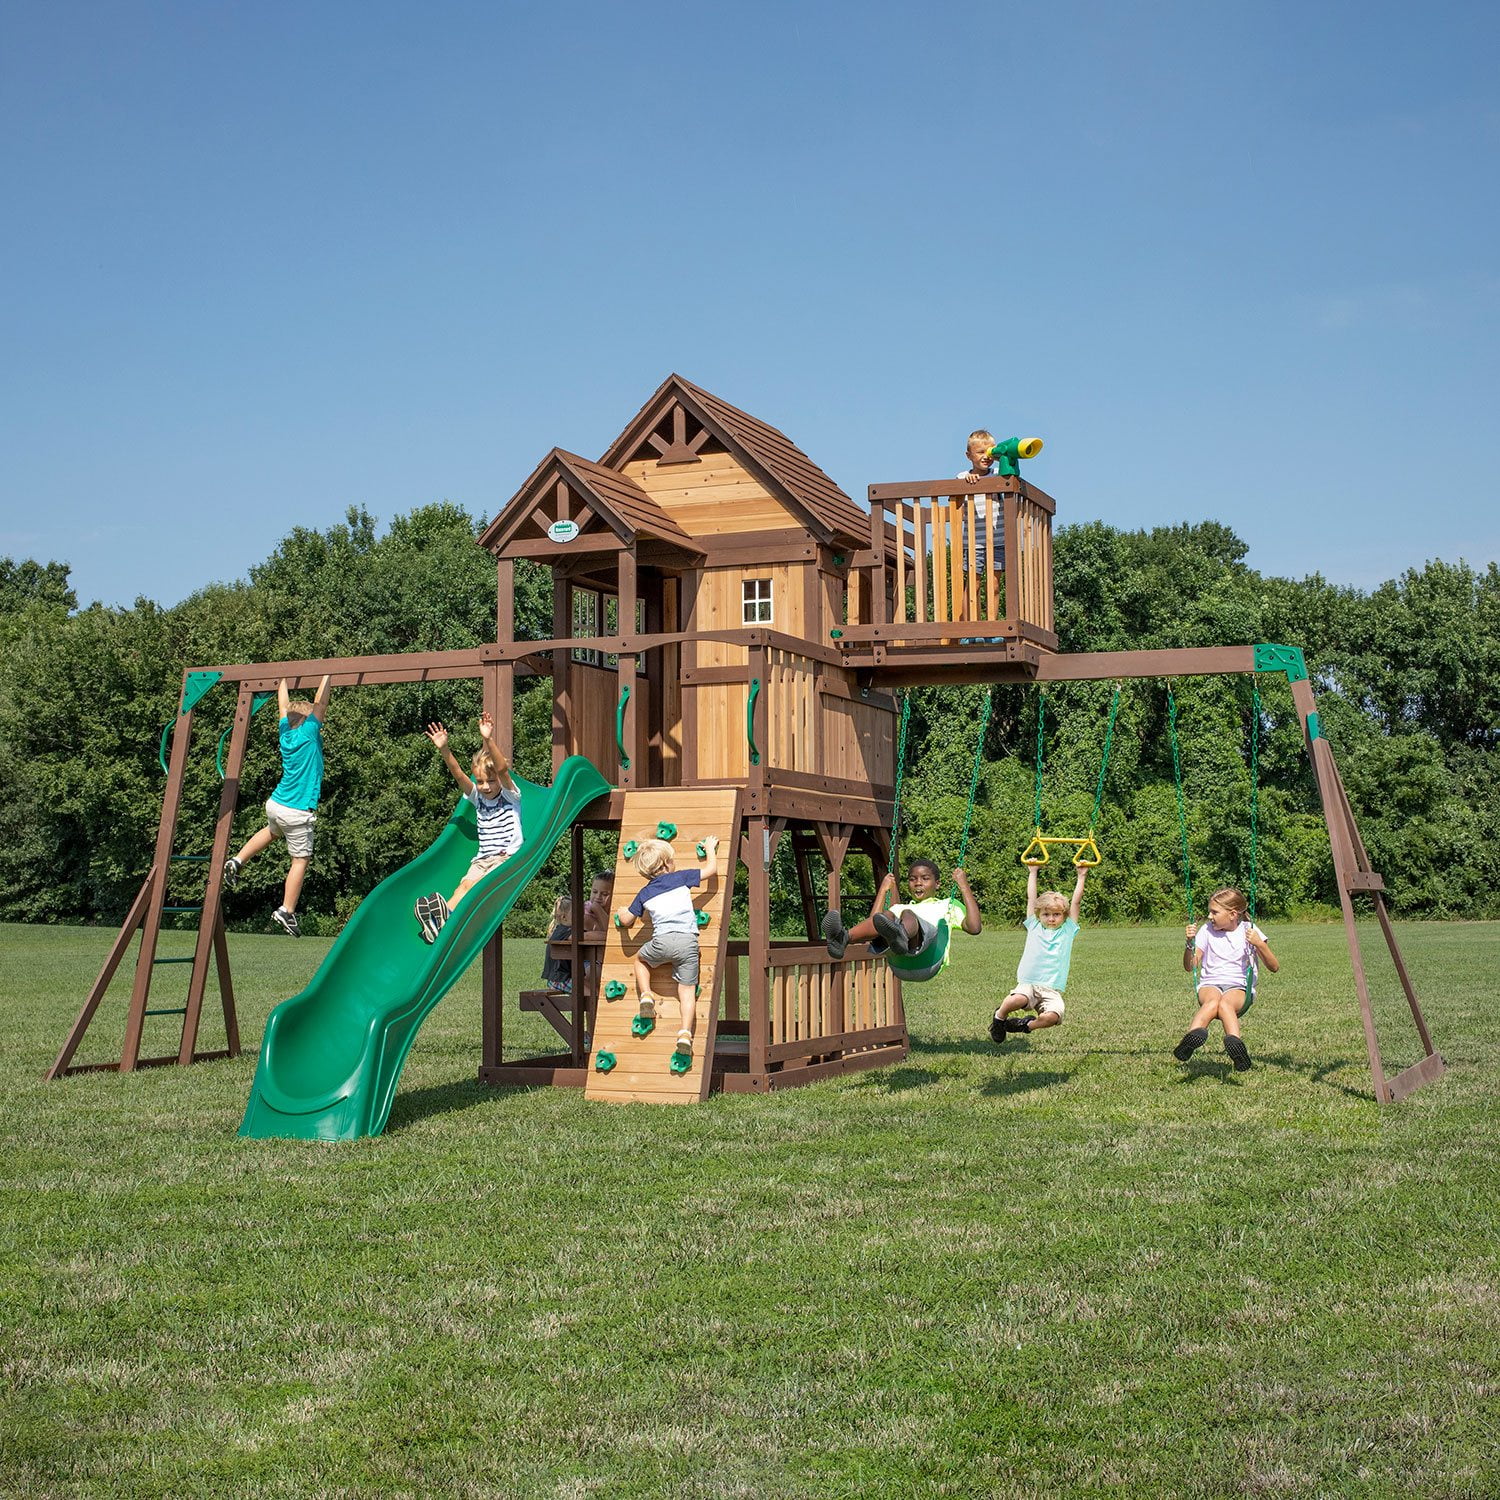
[This review was collected as part of a promotion.] I recently got the Discovery Playset SKYFORT II WITH WAVE SLIDE for our backyard, and it’s been awesome! My kids are obsessed with the wave slide and love hanging out in the upper clubhouse, pretending it's a princess castle. The rock climbing wall and ladder are perfect for keeping them active, and the swing set with the two-person glider is a huge hit. The cedar wood is not only good-looking but also super sturdy, so I feel confident about their safety. The instructions for putting it together were clear, and having some friends help made it easier. This playset has turned our backyard into a fun, exciting place where the kids love to play for hours. The quality outdoor play equipment that is totally worth the investment. I highly recommend the SKYFORT II to anyone wanting to create a cool outdoor play area for their kids.
This set takes some time and patients to assemble. We were missing one piece, so inventory immediately. Missing board was sent in about 5 days. While we inventoried pieces, we marked each one with colored chalk and put them in piles according to "letter". This make finding them much easier. Total time took about two and half weeks including time to level yard and put lumber around to contain rubber mulch with many unavailble days due to rain. The directions are vague and confusing at some places, with one part having to unassemble some planks to continue. However, my kids can't wait for nicer weather to play on their swing set. It has everything a kiddo could dream of!
Thank you for the review
A great investment to get your kids outside
My parents and I coordinated the purchase of the Skyfort II for my three kids (10, 7, and 5) this past Christmas. Best purchase ever. Even in less than great weather, my kids are clamoring to get outside. That’s right it’s 2023 and my kids want to be outside. My 10 year old is pushing 80 pounds and this equipment is holding firm under his weight on the swing. It’s held up against much larger kids as well. There is no or only barely noticeable twisting or buckling that I had seen on some of our earlier and cheaper play sets. It’s held me as I sat in the fort part of the structure without so much as a creaking of wood and I’m well over 200 pounds. I will say we did pay to have it professionally installed and it was worth it. My kids love it. My wife and I love it. Everyone that’s come to our house love it. I cannot recommend the Skyfort II highly enough.
Kids Are Thrilled
We could not be more thrilled with the end product. My husband is a carpenter and has been for the better part of 2 decades. It did take him quite awhile to assemble the playset, but he commented multiple times that the quality of all the hardware, wood, etc was very good. We only had one board split. We did put a sealant on the wood prior to assembling it so that did add substantial time to the process. In the end, the kids are thrilled with their new hangout. We live in a rural setting so we don't have easy access to the parks in town. The playset has already provided hours of enjoyment for my girls. I am one happy Mama.
Lots of work, but worth it.
We just assembled this thing last week. Here is my experience and my recommendations. After ordering this Playset, I printed off a set of instructions. It gave me a chance to get familiar with the parts and assembly sequence. It also gave me dimensions that I needed to make sure ground was leveled. I bought better wood screws with torx head. I believe I went with 2", 1-1/4", and 2-1/2 inch screws. I should have got a box or 2 of 1-1/8" because there were many of those and I had to use their phillips head they provided, which was a pain. So, when the playset arrives in 4 large boxes, I recommend going through each box, one at a time and checking off the inventory sheet that is provided in each box. Lay everything out. There are stamps on each board and they are faint. If one is too faint, use the directions that show the piece and re-label it at this point. Put all the stamps in the same direction. This helps later when searching for the board you need. In my case, the boards that I laid vertical, I had stamps at top. If boards were placed horizontal, the stamps were to the left. There were some boards marked the same, but in different boxes. So keep that in mind. After you inventory each box, you can put all like boards together to save time and floor space. Like other reviews on here, it is absolutely necessary to sort out the hardware before you begin. The instructions are set up in steps. Starts out with sub assemblies, such as the slide, rock wall, etc. All together their are about 140 steps or so. Each step states what hardware is needed to complete the step. So buy large baggies and put hardware in there for each step, and clip the bag to each step. This is time consuming but will save you time, I promise you. Once my adult son and I started, it took us about 14 hours the first day. We stopped twice to eat. The second day, we spent 16 hours on it, taking only 1 break. The last day took about 3 hours attaching the sub assemblies onto the fort. The instructions were pretty good. The only problem was an occasional board that was hard to tell which way was to be orientated. But for the most part, we had zero trouble. Just takes time and patience. I recommend using a couple of cordless drivers for screws. Do not use an impact wrench.. we destroyed a few pieces of hardware with one. Also, there are 3 or 4 places to put spindles that need to be spaced apart. Make spacers before you begin. It helps. There are places you need to drill holes. Almost every hole we drilled through the board (mostly 7/16") blew out and splintered on the back side. So have some sandpaper and stain so you can make it not look so bad. Overall this was a good bonding experience for my son and I, and his daughter absolutely loved the playset. I believe it was worth it. As a side note, we had a party with about 30 people and many children. I bought a bunch of fireworks and the kids watched from the playset. It was great to see them have such a fun time.
Quality merch Great price
Had a few missing pieces called customer service and they were at my door within 2 days. My husband and I got it together within 24 hrs, spread out throughout a few rainy days during Thanksgiving break. My kids love it. I've seen many playsets cheap for little money. This one is very nice good quality and heavy duty for a decent price. My girls are 4, 8, and 11, and they all love to play in it.
Easy Assembly Method
[This review was collected as part of a promotion.] Started this project Wednesday and placed the last bolt on Friday totalling to about 15 hours. Our Method: The builder The organizer The organizer will need to lay all 4 boxes out (the parts are scattered) and organize them by letters then numbers. The organizer will keep the book and have each step with the parts ready for the builder (this helps by avoiding over looking steps) while the builder is working on that step the organizer will prepare the following step. Once the builder completed that step the organizer will take a quit glance and ensure the step is accurate. (This helps overall accuracy) The builder will download the BILT app on their phone and use that as a secondary instruction manual with step by step and 3D animated instructions. The builder and organizer will continuously be on the same step. This method helps ease the stress. There builder doesn't have to worry about scrambling everywhere looking for parts and the organizer doesn't have to worry about the labor. This splits the work and stress down the middle. Before you know it your done. Note: Be careful with the T-Nuts as they have sharp claw edges. I sliced my finger on one when drilling the bolt into it using my hand as a guide to keep it secure it warped on me, spun and flew off while cutting my finger, ensure you hammer each T-Nut in the hole before applying the bolt with the impact wrench or drill, at times you may want to hammer the T-Nut further into the wood than just flushed, this will help it remain secure when torquing the bolt down. If the T-Nut does catch correctly it will spin against the wood and the T-Nut is warped. Use a ladder when you start the crows nest area, it's much safer and you'll have more room to work. Good luck.