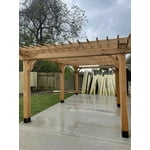
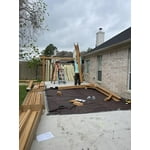
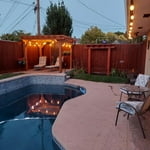
Started with just myself up thru STEPS 7, then two men for STEPS 8, 11, 14 thru 16, and 18. Most of the entire family joined in from this point on. Preliminary assembly and assembly-STEPS 1 thru 7, 9 thru 10, 12 thru 13, and 17 I did in my garage while waiting for HOA approval and concrete slab completion. (The good news is, there were no missing/damaged parts, save for what I considered to be minor blemishes in the surface of three different boards. Upon final assembly, there were no shortages and surplus in nearly all of the hardware parts). We chose to pre-stain everything from this point forward in the installation.
1st complaint: The sum of the various lap-joints does not produce the same thickness as the original board. Note: Depending on your selection of stains, this can be less noticeable in the final assembly.
2nd complaint: The depth of the lap-joints is often inconsistent, resulting in gaps as large as 1/8 inch. I know of no easy way to camouflage this,
Note: I consider both of these complaints to be the result of a quality-control problem.
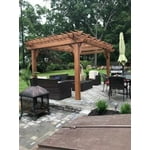
If you choose to follow the Manual (Anchoring Layout pg-3, as we did), this can result in some of the Posts not standing perfectly vertical. To the critical eye, this can be annoying. Suggestion: Follow the Manual (Anchoring Layout pg-3) for a starting point, but before anchoring the base of any Post, tighten all hardware except those affecting the Post alignment. Then, make any fine-tune vertical alignments to the Posts using a carpenter’s level. (If everything has been done correctly up to this point, this should be very minimal). Lastly, anchor the Posts.
Caution: I didn’t pay enough attention to the location of the pre-drilled holes in the JOIST and ended up with some of the pre-drilled holes facing down instead of up and on the outside instead of the inside (or vise-versa) of the POST. This will extend the installation time no matter how you choose to solve it.
3rd complaint: Neither of the inside POST (POST P03) were pre-drilled for the CORBEL on one side only as they should have been.
Note: This I consider to be another quality-control issue.
4th complaint: Because there is no staggering of the lengths of the PURLINs, all the joints fall on a single SLOTTED-JOIST at each splice point. This leaves you with no attachment to the PURLINs to those two particular SLOTTED-JOIST leaving them less stable than the others.
I chose to replace the PURLIN splicing bolt, nut, and washer in four staggered locations across the length of these tow JOIST with a 3” long - ¾” lag bolt and washer making the splice point serve as the anchor point to the JOIST in those four locations.
If you are anchoring your Pergola to concrete, I discovered that dipping the concrete anchor screws in thick liquid soap such as hair shampoo before driving them will keep them from seizing up during driving. (Learned this the hard way).
 Customer reviews for Backyard Discovery Beaumont Cedar Pergola with Trellis Roof and PowerPort, Choose Size for